I took an amazing class June 13-19 at Touchstone Center for Crafts in Farmington, Pennsylvania taught by Mark Aspery and his more-than-able assistant, Gerald Boggs. I took a week of vacation and really expanded my craft during my time there. The place was great, with very nice dorms and lots of other artists there to talk and eat meals with and a campfire every night to sit around and talk to other artists. It was very cool.
The class was based around making a pass-through ring to learn about all aspects of joinery. The idea for the class was an inspiration Mark had when he viewed a similar ring in one of Fritz Kuhn's books from the 1920's and was motivated to understand how this was done. He spent the next several months reverse engineering the ring and how to make it as part of the research for his third book, coming in a year or so, that will focus on joinery techniques for the blacksmith.
The ring itself starts with a 1/2 straight bar that forms the ring. There are some relatively complicated mathematics (for me, anyway!) to measure the stretch of the metal and the holes in it as it bends into a ring, so much of the lecture time was focused on this. It was a great growth experience to immerse myself in the details of how something like this is made and the reasons things are done certain ways. The complexity and accuracy inherent in a piece like this required an intense focus and precision to get it right and that also was a good learning opportunity for me. For example, all the holes are punched before assembly and they cannot be off more than 1/16 or the piece will not fit together.
The ring itself starts with a 1/2 straight bar that forms the ring. There are some relatively complicated mathematics (for me, anyway!) to measure the stretch of the metal and the holes in it as it bends into a ring, so much of the lecture time was focused on this. It was a great growth experience to immerse myself in the details of how something like this is made and the reasons things are done certain ways. The complexity and accuracy inherent in a piece like this required an intense focus and precision to get it right and that also was a good learning opportunity for me. For example, all the holes are punched before assembly and they cannot be off more than 1/16 or the piece will not fit together.
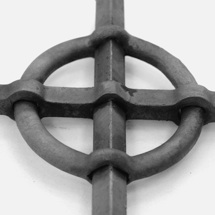
Mark's version (pictured on his website at http://www.markaspery.net/) of the pass-through ring:
In the class, we spent the first 3 days making all the necessary tools to make this pass-through ring.
- 1/2" drift
- 9/16" drift
- 9/16" slot punch (tempered)
- 3/4" square drift
- 3/4" slot punch (tempered)
- Fulstum cone
- Hardy base for the cone
- Chainmaker's swage
- 1/2" round hardy bottom tool
For the piece itself, there are two square holes punched in the round bar before it is bent in several stages into a semi-circle (later into the full circle). The square vertical bar comes next and two round holes are punched in it that will eventually allow the ring to pass through those.
There is an interesting lesson in that square piece alone because metal expands when it is hot like most things, so it will essentially be larger when the holes are punched and then shrink as it cools. This has to be taken into consideration when punching the holes, so it is not only the alignment of the holes (where they are on the bar) that must be measured, but also the size of the final hole when it is cool. Essentially the hole has to be slightly larger than the bar passing through it when it is cool (Mark calls is 1/2+) and then punched slightly larger than that (1/2++) to allow for the cooling because it is punched hot. This concept has some interesting implications on your tooling as well, since the tool itself has to be correctly (and accurately) made to one of these three sizes so the hole ends up correct at the end.
Which size should the tool be, you ask? Well, it can't be 1/2" because that is the same size as the bar passing through it and it can't be 1/2+ because the hole must be that size when it is cool (finished) so the ring can safely pass through it. Since the piece will be hot when punched, the tool must be made to punch 1/2++ so the hole can cool (shrink) back to the proper size. We made our punch and drift to make the holes 9/16" and that allows enough space for the ring to pass through even after the shrinking.
So, the class was incredible because we learned and practiced an amazing variety of skills and disciplines just to get to the point where we could consider making the piece. I consider the event a major growth period in my progression as a blacksmith and I am glad I had the opportunity to participate.


